


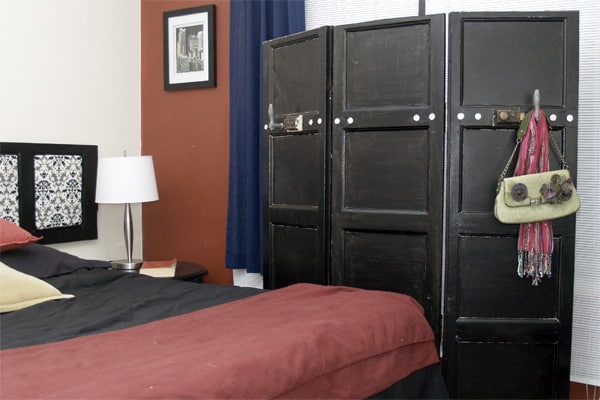
There are a variety of do it yourself tutorials available on the web, explaining everything from how to upscale a t-shirt to how to build your own kitchen table. Many DIY projects use things that you already have at your disposal. Here one simple DIY project involving some old wooden doors that can add a fun flare to your living space.
Whether you have a few old doors lying around from a remodel, or you went to a local salvage yard and found some, this DIY Project is perfect, simple, and quick. All you need are three doors, four hinges with screws, and some paint in the color or colors of your choice. After that, this project can be completed in three easy steps.
Step One: Set up your work space
Find a large, clean, open area, preferably outside or in a garage, where you can lay out all your supplies and work uninterrupted. If you are planning to work outside, make sure you are clear of any trees or structures that could drop leaves or other debris down on your project. You may also want to lay down new paper or painting paper if you don’t want the area be covered in paint. Lay the three doors out side by side in the order you want them to go when the project is finished.
Step Two: Paint the doors
Once your workspace is set up it’s time to get painting. You can use some old paint you have lying around, or purchase specific colors. If you like the natural color of the doors you found, you can even get some stain instead. Either way, you will want to paint or stain the doors one side at a time, with about a day in between to make sure they have time to dry completely. And don’t forget to be creative and have some fun. A layered look is always a fantastic option if you want some more depth to your artwork. Paint one color beneath another, and once the paint is dried sand off the top layer in certain places for a layered look. This may take a bit longer but it adds another creative element to your decoration. You can also paint designs such as numbers or pictures on the doors if you want.
Step Three: Assemble the divider
If you’re not handy with a drill or screw driver this might be time to get some help. At this point it is easiest to work from left to right. Start by placing two of the hinges between your first two doors – the far left and the middle. Screw them in and the flip them over. Place the next two hinges on the other side of the middle door and the last door, on your far right. This will allow you to position your room divider in a fan-like fashion. And remember, the hinges don’t have to be perfectly lined up. If they are a little out of alignment, it will just add to the look.
Now your project is finished and it is time to find it a home. Whether you use it to separate a cozy book nook from the rest of your living room, or simply to add some flare to your space, this easy DIY project will be a wonderful talking point when friends and family next stop by.
Please feel free to contact Ella Gray at ella.l.gray@gmail.com with any questions that you may have.


